“Sebastião Salgado was born on February 8th, 1944 in Aimorés, in the state of Minas Gerais, Brazil. He lives in Paris. Having studied economics, Salgado began his career as a professional photographer in 1973 in Paris, working with the photo agencies Sygma, Gamma, and Magnum Photos until 1994, when he and Lélia Wanick Salgado formed Amazonas images, an agency created exclusively for his work” — Ilford featuring his preferred papers. https://ilford.com/ilford-masters/sebastiao-salgado/
“Hello, I was informed that you mention I work as a printer for Sebastiao Salgado. As a matter of fact, I am only developing films for him. The prints are made by his printer, Dominique Granier. Contrary to what is generally said, A49 is not like Agfa Atomal. Atomal didn’t have any paraphenylenediamine in it but A49 has some. I use A49 specifically for 220 TXP at 1+1. A49 might not work well with other films. For many b&w films, D76 is still a very good choice. Contrary to what is also said, Tri-X 35 mm film was not developed with Rodinal in Salgado’s work. He prefers not to have too grainy images. Philippe Bachelier http://www.philippebachelier.com”
Recurrence. We return to asking the first questions: How does X do Y?
“Sebastião Salgado’s Genesis – How did he do it?”
“He has used Leica and Pentax 645 film cameras in the past, but migrated to digital capture during the course of the Genesis project. As explained by the photographer’s wife and partner, the resulting digital files were converted into analog negatives and silver prints to insure a consistent aesthetic throughout the project”
The (partial) answer to Salgado’s method is in a video posted to those people within the past weeks. They never get further than asking — the main truth of the amateur.
Undercut is a term from etching; it means the acid bit so deeply a part of the surround image collapsed — it becomes undercut. This happens in Ciba, in fact, it happens to thick layer pigment processes as well. In those processes, it appears as a washing away of detail during the processing of the pigment+colloid emuslion.
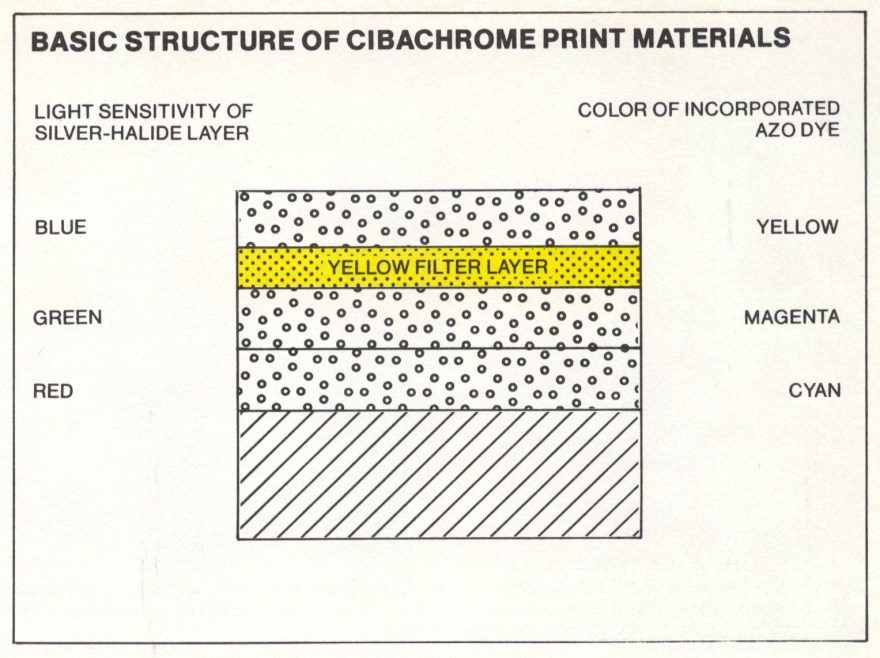
simplified render of Cibachrome materisl.
Pay attention to the layers
Top contains YELLOW dye
Middle is MAGENTA dye
Bottom is CYAN dye
the dyes are formed when exposed to light and “developed” [bleaching]
Ciba is a direct print, ie, a reversal — in commercial labs, this was generically listed as a Type R. We used the Kodak designation even though it wasn’t correct. At times this caused customers to object to the price, since Kodak’s R prints were typically cheap prints. I used the the phrase Review print, since what we wanted to print were dye transfers, or type Cs. Cibas were most often printed in home darkrooms, and by smaller specialized labs. Paris was a major center of Ciba printing… many photographers where shooting Kodachrome.
Kodachrome, Ektachrome and Ektacolor print film could make good Cibas. Dye differences caused differences in filter pack, some of which wasn’t readily correctable. These are the contrast effects. Cyan contrast of Cibachrome is lower than of Kodak ‘chrome materials.
Peak sensitivity of Ciba -II is ~640nm. Kodak Kodachrome cyan has a narrower absorption and sharper peak at shorter wavelength than Ektachrome E-6 dye.
Contrast change, or detail loss, occurs when the catalyst increases in any given layer because no bleaching occurs in the other two layers. This also makes the visual contrast different than the chrome. There is little automatic correction possible by the printer, since this is a factor of the Dye Destruction, (dye bleach) process.
Some very few labs made corrections to Cibachrome prints by use of dye-transfer over-printing. This overprint could be a “detail” line or an area color matrix, which was transferred to the finished Cibachrome print. I knew of only a small handful of labs doing this. It was taught, but not widely, since it required equipment and supplies of two distinct, costly processes.
It was a service I provided to some labs in NYC and Philadelphia.
Type R’s have black borders; something ad agencies didn’t like. No place to write. We exposed the border — light-bleach was the term.
White border jig. Exposure of borders of print on type R’s / Cibas produced WHITE borders instead of typical BLACK border.
This jig style was also used to make “edge” borders on BW prints. The Full Frame look achieved with a cutout Omega carrier.
Use Kodak 2E Color Correction filter, if necessary
. . . . Use Kodak 85B Color Correction filter
. . ASA/ISO film speed of Cibachrome
. . . . about 3.0 with no filtration
. . . . about 1.0 with 85B
. . . . Clear film is faster
. . . . 2E UV filter requires no exposure increase
1981 ciba self masking for red
1983 overexposure Take care not to heat Cibachrome bleaches. Ciba-Geigy recommends using a water rinse step between bleach and fixer to reduce the formation of sulfur dioxide gas. • When mixing or disposing of Cibachrome bleach solutions, wear an approved full face mask.
Dr. Bela Gaspar created Gasparcolor, the dye bleach process upon which the Cibachrome process was originally based. It was considered vital to the war effort in the 1940s. Gaspar turned down many offers to sell the rights to his process and after he died, Paul Dreyfus, who was the chemist and technician for Gaspar, went to work for CIBA AG. When the patents ran out, he developed the process for Cibachrome. (Frozen Moments – Richard C. Miller) In the 1960s, the Cibachrome process was originally engineered by the Ciba Geigy Corporation of Switzerland. Ciba acquired Ilford in 1969,[2] and sold it to International Paper in 1989;[3] in 1992 [4] the product was renamed to “Ilfochrome”. Colloquially, however the process is still referred to as “Cibachrome”.
Before 2004 Ilford Ltd had two main manufacturing sites: Mobberley in the UK, where most traditional products were made, and Fribourg (Freiburg) in Switzerland, where Ilfochrome and Ilfocolor papers were made, as well as the inkjet papers. The UK side was subject to a management buyout, and the Swiss operation (Ilford Imaging Switzerland GmbH) was sold to the Japanese Oji paper group in 2005 and to Paradigm Global Partners LLP in 2010. The Swiss plant retained the Ilford name, while the UK operation was inaugurated under the name HARMAN, taken from the name of the founder of the original Britannia Works. Ilford Photo HARMAN Technology Ltd can still use the Ilford brandname and logo under license on previously existing products, while new products will carry the Harman name.
In 2012, Ilford announced its final production run of Ilfochrome Classic in response to declining market demand attributed to the expanding popularity of digital image making.
Making the coating: Cibachrome is coated in 6 stages or 5 depending on formulation, but can require up to 8 or 9 stages if you do it according to the Ciba/Ilford method. As you do each stage, you reduce the yield due to coating imperfections — all in total darkness.


You must be logged in to post a comment.