Index Prints

The idea print. Collecting visuals. Stages of the darkroom process. Beyond the wild guess. Looking more than once, while looking at more than one. Building the comparative response.

This index is from the librarians, not the linguists. /’ that it contains so much contradictory information that a verbal message is needed to fix its meaning ‘/ 

WHY make contact sheets — to see the roll, thereby providing selection by comparison.. provides an editorial overview as it reveals your progression of action in the event-scene.

The key point of this post is using “jigs” as aid to determining exposure of a print. They provide an efficient way to make several attempts, or tests of settings in making darkroom prints. Typically, they are used to determine exposure setting, however, they could also be used to test changes in contrast filters, or color balance filtration, since while the “flaps” are closed, enlarger settings may be changed.

These devices are the commercial form of what was frequently a kludge made by the printer from cardboard, tape, or, perhaps, scavenged sheet film holders. My initial, 1960s version was made using scrapped film holders. These were sold by the cardboard box full at the surplus stores.

The start point. finding a way in the dark. What is the exposure setting for darkroom materials. Color or black-white paper exposure must be tested; determined by making trial exposures. These are called “test strips” — strips, small samples of the material you will use to make your print.

Durst Test Print Tool
Ways of making test strips.

Drawing patterns, making conclusions.
Index prints are also known as “contact sheets,” or “proof sheets.” Most uses of these are as first edit device for selecting among negatives/slides. The exposure, contrast and processing controls are sometimes lax. I try for a first best use setting for the most interesting of the negatives. This sheet serves as my point of search into my file of pictures. Rather than shuffling through the negatives, I shuffle through my index prints. These prints, in some cases, provide my an easy notepad of what was printed and when. The details of the printing will be in a print/darkroom notebook.


What is the start point of making a darkroom exposure

By using test jigs, I was able to characterize film for making separations for dye transfer in as few as 6 sheets of film. A morning’s work. It was sixty years later that a boastful amateur told a student of mine that wasn’t possible.

Good to know. #OIC

Why Didn’t You Make Dye Transfers

Everybody loved dye transfer. Nobody made them. Why? This century, this time span one and all bemoan the death of a friend they never knew. Never even visited.

  • supplies were a phone call away
  • documentation was available free, or for minimal charges
  • workshops were held at getaway photo shops.
  • several colleges held courses
  • trade schools were in major cities, or by mail-order

A simple enough question . with likely very few answers — honest, introspective responses.

The obvious response: there aren’t any materials . What about when there were — why didn’t you buy the Efke film? Assuming you were an adult in 1990, why didn’t you buy Kodak dye transfer material ?

And for those of you who did buy the materials: why didn’t you use them ?

Continuing along this expansion, for those of you who bought Materials and took a workshop, why didn’t you use dye transfer as your print process?

If you were drawn to dye transfer enough to buy the materials and take the training, why didn’t you expand your skills and become a die transfer printer?

Why do people buy beyond use : compulsion vs obsession. The ownership vs the authorship. Do they believe themselves stewards?

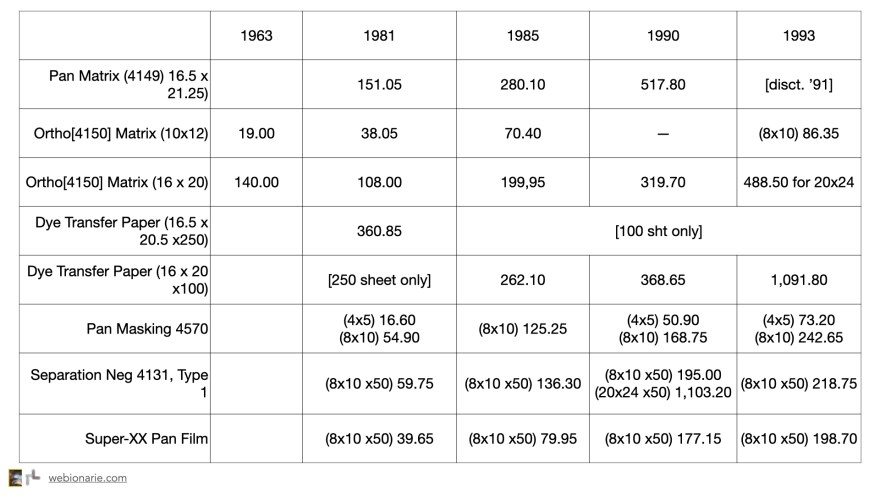
Catalog prices for some Dye Transfer supplies. These are the retailer list price. Labs paid much less.

Consider: Giffen vs Veblen goods. The professional depended on the supplies. The hobbyist didn’t. 1981 was a break year for Kodak’s process. By 1986, the decision had been made to let the process run out the clock. During this time, the larger labs had a decreasing dye transfer business. It was maintained as a prestige factor attracting interest but resulting in few projects. Small specialist labs grew in the eighties; even the best known added other processes to their sales brochure. “Now, the finest Black and White from the finest Color Lab.” — 1987 —

Kodak chose not to license, nor sell the process[ 1981,2] . Wonder why? In their final run of product, the only supply sold completely was Tanning developer. Nope, not even all the matrix film was sold. Not even the Pan Matrix. So it goes…. much of the film and paper was held in store for years.

and then it was recycled. The Fotokemika branded Efke matrix film also saw few buyers.

Maybe there is a market for the Coffee Mug, the Trucker Hat, the Film Vest… not the film… Sell the tchotchke, maybe the tattoo, no need for the mats and blanks.

nutshell: Color Separations

a reminder of color separations: what they are; what they do.

A separation is a pulling apart — taking either the scene, or its first duplicate into distinct parts. The separation is based upon the color. These being the primary colors of tri-color theory.

Film wasn’t always on ESTAR, so small holes would fail; they weren’t done. The stable base was glass — not punchable. We had methods, just not punch-pin positioning systems.

Masking can be done pre or post separation. // more to come//

craft skill from the book of Reproductions. These were from ‘inkside’ of the past, along with the current vantagepoint. The titles and the dog-tags for return reading.

Choosing film is premised upon several factors, notably, color response and curve dynamics. Can the separation match the transparency? Can the film render the colors in the transparency as monochromatic approximates. Much, too much, is said about “long straight line” needs of separation and mask films. What you are separating from rarely has as long a linear portion as most BW films; not now, and certainly not in the past when seps were the king of the darkroom.

From the past; more for the Rosetta stone. Translating data sheets. Why that film/developer was made.

Dupont Fine Grain Pan: an easy 20x intermediate film. Soup in 6-D or 53-D.

Why Dupont 16D developer: times of 6,7,8,9 minutes gave those gammas (close enough to get you started on separations using Dupont films.

from 2005: Modern vs. Classic. Thin vs. Thick Emulsions’

Early form of specialized equipment designed to make separation negatives.

It looks quite “steam punk” in this light. Hardly the item of extreme, near sacred skill-tool of conversation on today’s net world. The virtual barstool has a way of inflating all needs beyond the original.

Making the process sound complex has a purpose: make the teller important.

Balanced pan-chromatism — the secret word on separation negative film.

not Filter Factor, rather Exposure Ratio. Notice the difference in using Heat Absorbing Glass — IR glass was as important as voltage stabilization in the best custom labs. The “4 shift” places all knew this. Not now. The forums think the glass is so negatives don’t pop — change during exposure.

IR and UV affect emulsions… even just a bit. The amount makes significant difference when making seps with a responsive emulsion.

Emulsion TypeRed NegativeGreen NegativeBlue Negative
PanchromaticUse Red filterUse Green filterUse Blue filter
Ortho-chromaticUnsuitable. insensitive to redUse minus-blue or green filteruse minus-green or blue filter
Ordinary (non-colorUnsuitable. insensitive to redUnsuitable. insensitive to greenNo filter needed. UV or minus-green or blue filter.
some types of emulsions will not reach the required gamma on the blue record, even with long development. An inherently higher contrast material can be under-developed to provide a lower gamma negative.

The above table was often used as a test of new employees … did they understand the theory enough to make separations using the “wrong” film or developer. Failure meant not trying. Understanding development scheme on curve shape was a key skill among the proficient lab tech. Use fresh developer. Use consistent agitation, including the rhythm. Blue sep toe usually reaches higher density than the red and green seps. Use this during your density limits, your aims, for the linear portion of your characteristic. In practice, that is part of why we set low limit above 0.40, with 0.30 being the lowest safe value for a separation set.

Adage: Mix for Four. Use Three. — meaning: put only 3 sheets through chemistry that should work for 4 sheets of film.